Recent Posts
How Accurate Are Air Mold Tests?
7/17/2024 (Permalink)
At SERVPRO®, we understand that mold can be a major concern for homeowners and business owners alike. One common method to identify mold presence is through air mold tests. But how accurate are these tests, and can they truly provide reliable results? In this blog, we’ll dive into the intricacies of air mold testing and explore its accuracy.
Understanding Air Mold Tests
Air mold tests involve collecting samples of air from your home or business and analyzing them for mold spores. These tests are typically conducted using spore traps or air sampling pumps that capture airborne particles on a sticky surface or in a liquid medium. The samples are then sent to a laboratory where they are examined under a microscope to identify and quantify mold spores.
Factors Affecting Accuracy
Several factors can influence the accuracy of air mold tests:
- Sampling Location: The location where air samples are collected plays a crucial role. Sampling in areas with visible mold growth or water damage will likely yield higher mold spore counts. Conversely, sampling in clean, undisturbed areas may not provide an accurate representation of the overall mold presence.
- Timing and Conditions: Mold spore levels can fluctuate based on environmental conditions such as humidity, temperature, and airflow. Sampling during different times of the day or under varying weather conditions can affect the results. For example, high humidity levels can increase mold spore counts in the air.
- Duration of Sampling: The duration for which air samples are collected also impacts accuracy. Longer sampling times can provide a more comprehensive picture of mold spore levels, while shorter sampling durations might miss transient spikes in mold spore concentrations.
- Equipment Calibration and Handling: The precision and calibration of the sampling equipment, as well as how the samples are handled and stored, can influence the test outcomes. Improper handling or equipment malfunction can lead to inaccurate results.
Interpretation of Results
Interpreting the results of air mold tests can be challenging. Mold spores are a natural part of the environment, and their presence in air samples does not always indicate a problem. It’s essential to compare indoor mold spore levels with outdoor levels to determine if there is an unusual indoor mold growth. Additionally, identifying the types of mold spores present can help determine the source and potential severity of the issue.
Combining Methods for Better Accuracy
While air mold tests can provide valuable insights, they are most effective when combined with other inspection methods. Visual inspections, moisture assessments, and surface sampling can complement air testing to provide a more comprehensive understanding of mold presence and sources. At SERVPRO, our trained professionals use a combination of these methods to deliver accurate and reliable mold assessments.
Air mold tests are a useful tool in detecting and assessing mold levels in indoor environments. However, their accuracy can be influenced by various factors, and results should be interpreted with caution. Combining air testing with other inspection techniques can enhance the reliability of mold assessments. If you suspect mold in your home or business, contact SERVPRO for a thorough and professional mold inspection and remediation service.
For more information on mold testing and remediation, visit our website or call us today. At SERVPRO, we are Here to Help® you maintain a safe and clean environment.
The impact of fire damage on flooring and carpets
7/10/2024 (Permalink)
 At SERVPRO, we have the experience and expertise to handle these challenges, providing peace of mind during a difficult time.
When a fire strikes, the immediate concern is often the visible structural damage and the loss of personal belongings. However, the impact of fire damage on flooring and carpets is a critical aspect that requires immediate attention. At SERVPRO®, we understand that addressing these hidden damages is vital for the safety and restoration of your home or business.
The Nature of Fire Damage on Flooring and Carpets
Fire damage extends beyond the flames. The heat, smoke, and soot from a fire can severely affect various flooring materials and carpets, each in unique ways.
Hardwood Flooring
Hardwood floors are particularly vulnerable to fire damage. The intense heat can cause warping, cracking, and splitting. Smoke and soot can penetrate the wood's porous surface, leading to discoloration and a lingering odor. Even if the fire did not directly touch the hardwood, the combination of heat and smoke can cause significant damage.
Carpeted Floors
Carpets suffer from fire damage in multiple ways. The fibers can melt, burn, and become deeply embedded with soot and smoke particles. Synthetic carpets are particularly susceptible to heat and can emit toxic fumes when burned. The damage isn't just surface-level; it penetrates through to the padding and subfloor, requiring comprehensive cleaning or replacement.
Tile and Stone Flooring
While tile and stone floors are more resistant to fire, they are not immune. The grout can crack and tiles may become loose due to the heat. Additionally, smoke and soot can leave a residue that is difficult to remove, affecting both the appearance and integrity of the flooring.
The Importance of Professional Restoration
Addressing fire damage to flooring and carpets involves more than just a superficial clean-up. It's a process that requires expertise, specialized equipment, and a deep understanding of fire restoration techniques.
Assessment and Inspection
The first step is a thorough assessment. Our SERVPRO professionals evaluate the extent of the damage, including areas that may not be immediately visible. This includes checking under carpets, inside floorboards, and behind tiles to ensure that all damage is identified.
Cleaning and Deodorizing
Once the assessment is complete, the cleaning process begins. For hardwood floors, this might involve sanding and refinishing to restore the wood's appearance. Carpets often require deep cleaning, which includes the removal of soot and smoke particles from the fibers and padding. Tile and stone floors are cleaned and any damaged grout or tiles are replaced.
Restoration and Replacement
In cases where the damage is too severe for cleaning, replacement may be necessary. SERVPRO works to match your existing flooring as closely as possible, ensuring a seamless restoration. Our goal is to restore your home or business to its pre-fire condition quickly and efficiently.
Trust SERVPRO for Comprehensive Fire Damage Restoration
Fire damage to flooring and carpets is a challenging aspect of recovery. It requires a keen eye for detail, advanced cleaning techniques, and the ability to restore or replace damaged materials. At SERVPRO, we have the experience and expertise to handle these challenges, providing peace of mind during a difficult time. Trust us to restore your property with care and precision.
For more information or to schedule a consultation, contact SERVPRO today. Let us help you reclaim your space and restore your flooring and carpets to their former glory.
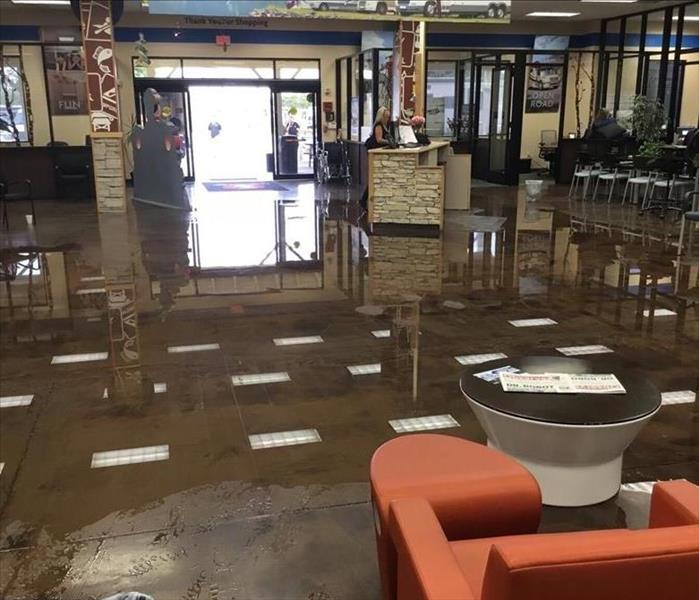
Water Damage in Commercial Properties: Retail Spaces and Warehouses
6/12/2024 (Permalink)
 With the right knowledge and prompt action, you can minimize the downtime and get your commercial property back on track.
Water damage is an unfortunate incident that can occur in any commercial property, including retail spaces and warehouses. Whether it's a leaky roof, burst pipe, or flooding from heavy rain, water damage can disrupt your business operations, damage inventory, and lead to costly repairs. However, with the right knowledge and prompt action, you can minimize the downtime and get your commercial property back on track.
Identify the Source of the Water Damage
The first step in addressing water damage is to identify the source. Quickly locate and shut off the water supply to prevent further damage. In retail spaces and warehouses, common sources of water damage include roof leaks, malfunctioning plumbing systems, and weather-related incidents. By identifying the source, you can better understand the extent of the damage and take appropriate measures.
Prioritize Safety
Before entering the affected area, ensure that it is safe to do so. If there are any electrical appliances or exposed wires, turn off the power immediately to avoid the risk of electrocution. Exercise caution and consider professional assistance when dealing with extensive water damage or potential structural issues.
Contact a Professional Commercial Restoration Service
Commercial water damage requires professional expertise to ensure thorough and efficient recovery. Contact a reputable commercial restoration service like SERVPRO® as soon as possible. SERVPRO specializes in commercial water damage restoration and understands the unique challenges faced by retail spaces and warehouses. Their experienced team can help assess the damage, provide expert solutions, and restore your commercial property efficiently.
Document the Damage and Notify Insurance
Before any restoration work begins, document the water damage by taking photos and videos. This documentation will be crucial when filing an insurance claim. Notify your insurance company promptly to initiate the claims process and ensure you have all the necessary paperwork ready.
Remove Standing Water
If it is safe to do so, start the water extraction process to remove standing water from the affected areas. Utilize pumps, wet vacuums, or other appropriate equipment to remove as much water as possible. Swift removal of standing water helps minimize potential damage to structural components and reduces the risk of mold growth.
Dry and Dehumidify
After water extraction, it is vital to thoroughly dry the affected areas. Use powerful fans and dehumidifiers specifically designed for commercial spaces to accelerate the drying process. This step is critical in preventing the growth of mold and mildew, which can be damaging to inventory and affect the air quality within your commercial property.
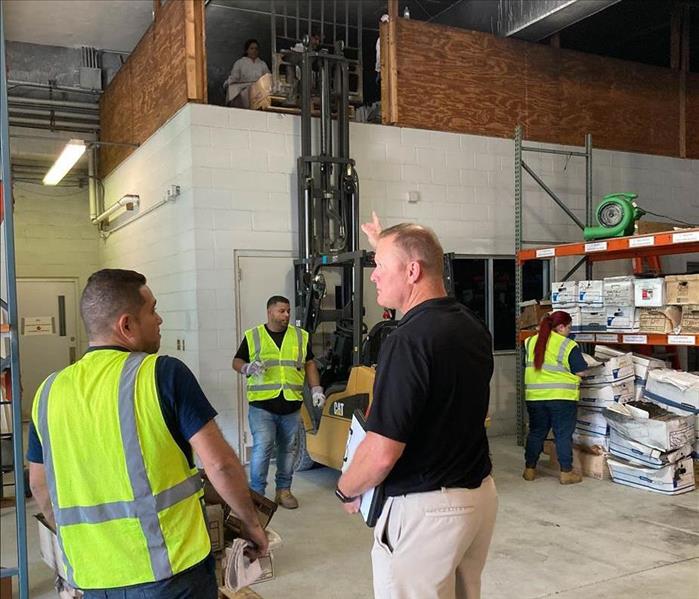
Assess and Restore Inventory and Fixtures
Once the affected areas are dry, evaluate the condition of your inventory and fixtures. Dispose of any damaged or unsalvageable items following the guidance of your insurance provider. Clean and sanitize salvageable items to ensure they are safe for use or sale. Additionally, inspect and repair any damaged fixtures such as shelving, display units, or flooring to return your commercial property to its pre-damage condition.
Prevention is Key
To minimize the risk of future water damage, it's essential to implement preventative measures. Regularly inspect your property for any signs of leaks, roof damage, or plumbing issues. Ensure your property's drainage systems are clear and functioning correctly. Address any identified issues promptly to mitigate potential water damage risks.
In conclusion, water damage in commercial properties such as retail spaces and warehouses can have severe consequences for your business. By following these recovery and clean-up tips, along with the assistance of a professional commercial restoration service like SERVPRO, you can minimize the impact of water damage and restore your commercial property efficiently. Act promptly, document the damage, and rely on expert help to ensure a thorough and effective restoration process.
How to Handle Fallen Trees and Debris After Cape Coral Storms
5/15/2024 (Permalink)
 In this blog, we will explore important steps to take when cleaning up fallen trees and debris after storms in Cape Coral.
When severe storms hit Cape Coral, they can leave behind a trail of destruction, including fallen trees and debris. It is crucial to handle storm damage promptly and safely to minimize the risk of further property damage and ensure the safety of yourself and others. In this blog, we will explore important steps to take when cleaning up fallen trees and debris after storms in Cape Coral.
Assess the Situation and Ensure Safety
Before you begin any cleanup, assess the storm damage and ensure your safety. Be aware of downed power lines, unstable structures, and other potential hazards. It is essential to stay away from any electrical wires and contact the appropriate authorities to report the issue. If you are uncertain about the safety of the area, it is best to wait for professional assistance.
Contact Professional Storm Cleanup Services
Dealing with fallen trees and large amounts of debris can be a challenging task. To ensure efficient and safe storm cleanup, it is recommended to contact professional storm cleanup services like SERVPRO®. These trained professionals have the expertise, equipment, and knowledge to handle fallen trees, clear debris, and restore your property to its pre-storm condition.
Secure the Area
While waiting for professional assistance, secure the area by placing caution signs or barriers around fallen trees and debris. This step will help prevent accidents and injuries and warn others to stay clear of the hazard.
Document the Damage
Take photos or videos of the storm damage, including fallen trees, damaged structures, and debris. These visual records will be useful for insurance claims and will help facilitate the storm damage restoration process.
Remove Small Debris
If it is safe to do so, begin by removing small debris like twigs and branches from walkways and driveways using gloves and appropriate tools. Bag the debris for disposal in designated waste containers.
Tackle Fallen Trees Safely
Removing fallen trees requires caution and expertise. If the fallen tree is small and manageable, you may be able to remove it yourself using proper techniques and equipment. However, for larger trees or trees near structures, it is best to leave the job to professionals. They have the necessary equipment, such as chainsaws, in addition to the experience needed to safely remove fallen trees without causing further damage.
Dispose of Debris Properly
Once the storm debris has been cleared, it is important to dispose of it properly. Check with your local authorities to understand the guidelines for storm debris disposal in your area. They may offer special pickup services or designate specific locations for debris drop-off.
Evaluate Tree Health and Consider Replanting
After the storm, evaluate the remaining trees on your property for signs of damage or instability. Engage the services of a certified arborist to assess the health of your trees and make recommendations. If necessary, consider replanting trees that have been lost to maintain the aesthetic value of your property.
By following these steps and seeking professional storm cleanup assistance, you can ensure a safe and efficient cleanup process after storms in Cape Coral. SERVPRO is here to assist with prompt storm damage cleanup and restoration services, helping you restore your property and get back to normal after a storm emergency.
Remember, safety should always be the priority when handling fallen trees and storm debris. Take appropriate precautions and seek professional assistance when necessary to minimize the risks associated with storm damage cleanup.
Restoring Fire-Damaged Roofing and Gutters: A Comprehensive Guide
4/17/2024 (Permalink)
 In this blog, we explore the essential steps to restore fire-damaged roofing and gutters, highlighting the importance of professional restoration.
After a fire incident, the damage to your home extends beyond the structure itself. Fires can cause significant harm to your roofing and gutters, compromising their integrity and functionality. Restoring fire-damaged roofing and gutters is a crucial step in the fire-damage restoration process. In this blog, we will explore the essential steps to restore fire-damaged roofing and gutters, highlighting the importance of professional fire damage restoration services, such as those provided by SERVPRO®, in ensuring a thorough and successful remediation.
Safety First: Assessing the Damage
Before any restoration work can begin, it is vital to ensure the safety of yourself and others. Carefully assess the fire-damaged roof and gutters, looking out for structural instability, loose or hanging debris, and the presence of any live electrical wires. If you suspect the integrity of the roof or gutters has been compromised, it is crucial to contact a professional fire damage restoration service immediately to handle the situation safely.
Engage Professional Fire Damage Restoration Services
Restoring fire-damaged roofing and gutters is a complex and potentially dangerous task. Engaging the services of a professional fire damage restoration company, such as SERVPRO, ensures that the restoration process is carried out by trained technicians with the necessary expertise, equipment, and knowledge to address the unique challenges of fire-damaged roofing and gutters. Professional restoration services can also mitigate further damage and provide a comprehensive approach to restoring your home.
Secure and Protect the Area
To prevent additional damage, the fire damage restoration team will secure the fire-damaged roof and gutters. This may involve boarding up or tarping damaged areas, stabilizing any weakened structures, and protecting the surrounding property from potential moisture intrusion caused by the restoration process or inclement weather conditions.
Assess and Repair the Roof Structure
Restoring a fire-damaged roof often involves a thorough inspection of the structural elements beneath the surface. Trained technicians will assess the integrity of the roof deck, trusses, rafters, and other supporting components. Any compromised sections will be repaired or replaced to ensure the stability and longevity of the roof. Repairing the underlying structure is vital before addressing the cosmetic and functional aspects of the roof.
Clean and Remove Soot and Smoke Damage
Fire incidents lead to the accumulation of soot, smoke particles, and residue on the roof and gutter surfaces. These contaminants not only detract from the overall appearance but can also cause long-term damage if left unaddressed. Professional fire damage restoration services utilize specialized techniques and cleaning agents to safely and effectively remove soot and smoke residue from the roofing and gutter surfaces without causing further damage.
Repair or Replace Fire-Damaged Gutters
Fire-damaged gutters may require repair or replacement, depending on the severity of the damage. Trained technicians will carefully inspect the gutters, assessing their structural integrity, functionality, and overall condition. If necessary, damaged sections or entire gutter systems will be replaced to ensure proper drainage and prevent water damage to the property.
Apply Protective Coatings
To enhance the fire resistance and longevity of your restored roof, professionals may apply protective coatings. These coatings not only provide a barrier against potential fire damage but also offer additional benefits such as improved thermal performance, enhanced waterproofing, and increased resistance to UV radiation.
Restoring fire-damaged roofing and gutters requires professional expertise, advanced techniques, and specialized equipment. Engaging the services of a reputable fire damage restoration company, such as SERVPRO, ensures a thorough and efficient restoration process. From assessing the damage and engaging in necessary repairs to cleaning soot and smoke residue and applying protective coatings, professional restoration services can restore the functionality, safety, and aesthetic appeal of your roofing and gutter systems. If you have experienced fire damage to your roof and gutters, contact a professional fire damage restoration team promptly to minimize further damage and ensure a successful restoration.
Dehumidifiers and Mold Prevention: What You Need to Know
3/13/2024 (Permalink)
 In this blog, we will explore the role of dehumidifiers in mold prevention and provide essential information on using dehumidifiers to combat mold.
Moisture control is crucial in preventing mold growth in your home. One effective tool for maintaining optimal humidity levels is a dehumidifier. In this blog, we will explore the role of dehumidifiers in mold prevention and provide essential information on using dehumidifiers to combat mold.
Understanding Dehumidifiers for Mold Prevention
Dehumidifiers are devices designed to reduce and maintain humidity levels in indoor spaces. They extract excess moisture from the air, helping to create a drier environment that is less conducive to mold growth.
Here are some key benefits of using dehumidifiers for mold prevention:
- Moisture Reduction: Mold requires moisture to grow, and high humidity levels can create an ideal environment for mold spores to thrive. Dehumidifiers help control humidity levels, keeping them below 50 percent, which inhibits mold growth.
- Prevention in High-Moisture Areas: Damp areas such as basements, bathrooms, and laundry rooms are prone to mold growth due to increased moisture. By using dehumidifiers in these areas, you can effectively manage humidity levels and reduce the risk of mold infestation.
- Protection for Vulnerable Items: High humidity can damage sensitive belongings like books, photographs, and wooden furniture. Dehumidifiers help protect these items by removing excess moisture from the air, preventing mold growth and preserving their condition.
Choosing the Right Dehumidifier
When selecting a dehumidifier for mold prevention, consider the size of your space, the humidity levels, and the extent of the moisture problem. Here are some key factors to keep in mind:
- Capacity: Consider the pint capacity, which refers to the amount of moisture a dehumidifier can remove from the air in 24 hours. Larger spaces or areas with high humidity will require a higher capacity dehumidifier to effectively manage moisture levels.
- Portability and Placement: Choose a dehumidifier that can be easily moved and positioned in different areas of your home. Portable units with caster wheels or handles offer convenience and flexibility.
- Noise Level: If you plan to use the dehumidifier in a living area or bedroom, consider the noise level. Look for models specifically designed to operate quietly, ensuring minimal disturbance to your daily activities.
- Energy Efficiency: Energy-efficient dehumidifiers consume less electricity, helping you save on your energy bills. Look for models with ENERGY STAR certification, which indicates optimal energy efficiency.
Complementary Mold Prevention Measures
While dehumidifiers play a vital role in mold prevention, they are most effective when combined with other preventive measures. Here are some additional steps to enhance mold prevention efforts:
- Ventilation: Proper ventilation reduces humidity levels, allowing moisture to escape your home. Ensure adequate ventilation in bathrooms, kitchens, and laundry areas to expel excess moisture.
- Fix Leaks and Moisture Sources: Promptly repair any leaks, plumbing issues, or roof leaks to eliminate ongoing sources of moisture.
- Use Exhaust Fans: Install and use exhaust fans in bathrooms and kitchens to remove excess moisture generated during activities like showering or cooking.
- Insulate and Seal: Properly insulate and seal windows, doors, and other areas where condensation can occur, preventing moisture buildup.
Dehumidifiers are effective tools in mold prevention, helping to maintain optimal humidity levels and create an environment that is unfavorable for mold growth. When selecting a dehumidifier, consider your specific needs and choose a model that suits the size and moisture levels of your space. Remember, using a dehumidifier is only one part of a comprehensive mold prevention strategy, and it is important to address any underlying moisture issues and implement additional preventive measures.
For professional assistance with mold prevention, remediation, and restoration, consider contacting experts such as SERVPRO® who specialize in mold restoration services. Their knowledge and expertise ensure that your home is protected from mold and its potential damage, providing you with a safe and healthy living environment.
Water Damage in Rental Properties: Tips for Landlords
2/22/2024 (Permalink)
 Water damage is a significant concern for landlords managing rental properties.
Water damage is a significant concern for landlords managing rental properties. At SERVPRO®, we understand the critical importance of addressing water damage issues promptly and efficiently. In this guide, we'll provide crucial insights for landlords regarding water damage in rental properties and how to handle such incidents effectively.
Understanding Landlord Responsibilities
Landlords have a legal obligation to maintain their rental properties in a habitable condition, ensuring they are safe and free from potential hazards like water damage. It's essential to comprehend these responsibilities to address water damage incidents promptly and appropriately.
Preventive Measures
Prevention is key in mitigating water damage risks. Encourage regular property inspections to identify potential issues such as leaks, plumbing problems, or inadequate drainage. Educate tenants about reporting any signs of water damage promptly.
Prompt Response to Water Damage Reports
Tenants reporting water damage concerns should be taken seriously and addressed immediately. A timely response can mitigate further damage, demonstrate landlord commitment, and foster a positive landlord-tenant relationship.
Insurance Coverage
Landlords should possess comprehensive property insurance that includes coverage for water damage. Familiarize yourself with the policy's coverage limits, deductibles, and exclusions related to water damage incidents.
Professional Restoration Services
In the event of water damage, promptly engage professional restoration services like SERVPRO of Cape Coral. Trained professionals can assess the damage, initiate cleanup and restoration, and mitigate further issues, ensuring a quicker recovery.
Documentation and Communication
Maintain detailed records of any water damage incidents, including reports, repair invoices, and communication with tenants. Clear communication regarding the restoration process and expected timelines is crucial for transparency.
Preventive Maintenance Agreements
Consider establishing preventive maintenance agreements with reputable contractors or service providers to conduct routine inspections and address potential issues before they escalate into larger problems.
Legal Obligations and Tenant Rights
Comply with local landlord-tenant laws and regulations regarding water damage incidents, repairs, and tenant rights. Understanding legal obligations ensures landlords act following the law.
Addressing water damage in rental properties requires proactive measures, swift responses, and adherence to legal responsibilities. By understanding these aspects and partnering with professionals like SERVPRO of Cape Coral, landlords can navigate water damage incidents effectively, protecting their investment and maintaining tenant satisfaction.
Everything You Need to Know About Storm Surges
1/8/2024 (Permalink)
 A storm surge is a rapid and abnormal rise in sea level that occurs during tropical storms, hurricanes, or intense weather systems.
Storm surges, often an underestimated threat during severe weather events, pose significant risks to coastal areas and can cause extensive damage to properties and communities. Continue reading to better understand, prepare for, and stay safe during storm surges.
What is a Storm Surge?
A storm surge is a rapid and abnormal rise in sea level that occurs during tropical storms, hurricanes, or intense weather systems. It is primarily caused by strong onshore winds and low atmospheric pressure, leading to an accumulation of water that moves inland, flooding coastal areas.
Understanding the Impact:
Storm surges can result in catastrophic flooding, causing immense destruction to homes, infrastructure, and natural habitats. The severity of a storm surge depends on various factors such as the intensity and size of the storm, the angle of approach to the coastline, and the shape of the coastline itself.
Key Factors Contributing to Storm Surge Severity:
- Wind Speed and Direction: Strong winds from a storm push water toward the coast.
- Low Pressure: A drop in atmospheric pressure can cause the water level to rise.
- Forward Speed of the Storm: Faster-moving storms can produce higher storm surges.
- Shape of the Coastline and Bathymetry: Coastal features and ocean floor contours affect surge height and reach.
Safety Measures and Preparedness Tips
Stay Informed: Keep track of weather updates, storm surge warnings, and evacuation orders issued by local authorities. Utilize weather apps, radio, or NOAA (National Oceanic and Atmospheric Administration) alerts for reliable information.
Evacuation Planning: If residing in a coastal area prone to storm surges, have an evacuation plan in place. Know your evacuation routes and shelters. Plan ahead and evacuate early if advised to do so.
Secure Your Property: Before to the storm, secure outdoor furniture, board up windows, and reinforce doors to minimize potential damage to your home.
Emergency Kit: Prepare an emergency kit with essentials such as water, non-perishable food, medications, important documents, flashlights, and batteries.
Storm surges are formidable and potentially life-threatening aspects of severe weather. Understanding their nature, preparing adequately, and heeding evacuation warnings are crucial for safeguarding lives and property. SERVPRO of Cape Coral stands ready to assist communities in storm-related restoration and recovery efforts.
For expert storm damage restoration services or further guidance on storm surge preparedness, contact our SERVPRO® team today. Stay informed, stay safe, and let us help you navigate through storm surge challenges.
Can I Restore Fire-Damaged Kitchen Furniture and Cabinetry?
12/16/2023 (Permalink)
 Restoring fire-damaged kitchen furniture and cabinetry is a process that combines expertise, patience, and the right techniques.
A kitchen fire can be a heart-wrenching experience, leaving you with damaged cabinets and furniture. But before you think about replacing everything, it's essential to understand that restoration is often possible. In this blog, we'll explore the potential for restoring fire-damaged kitchen furniture and cabinetry, giving you a step-by-step guide to bringing back the beauty and functionality of your kitchen.
Assessment is Key
The first step in restoring fire-damaged kitchen furniture and cabinetry is a thorough assessment. This should be carried out by professionals who can determine the extent of the damage. They'll look for visible damage such as burns, discoloration, or charring, as well as assess structural integrity. This evaluation will guide the restoration process.
Cleaning and Soot Removal
Soot and smoke residue often cling to wood surfaces, causing discoloration and odors. To start the restoration process, professionals will use specialized cleaning techniques to remove soot and other contaminants. Proper cleaning is crucial to prepare the wood for the next steps in the restoration process.
Sanding and Refinishing
Fire damage can leave kitchen furniture and cabinetry with visible blemishes and discoloration. Sanding is a vital step to remove damaged layers and reveal fresh wood underneath. Professionals will carefully sand the wood, smoothing out imperfections. After sanding, the wood is ready for refinishing, which includes staining, varnishing, or applying the finish of your choice to restore its beauty.
Structural Repairs
In severe cases, fire damage can compromise the structural integrity of kitchen furniture and cabinetry. Repairs may be necessary to ensure the safety and functionality of your kitchen elements. Professionals can replace or reinforce damaged parts, making your kitchen safe and reliable once more.
Odor Elimination
The lingering scent of smoke is a common issue after a fire. Professionals can employ odor elimination techniques, such as ozone treatments or sealants, to remove these persistent odors. This final touch ensures that your restored kitchen furniture and cabinetry not only look great but also smell fresh.
Restoring fire-damaged kitchen furniture and cabinetry is a process that combines expertise, patience, and the right techniques. Whether your kitchen elements have suffered minor or extensive damage, professionals can help you bring them back to life. The result is not just functional furniture and cabinetry but also a renewed sense of elegance and practicality in your kitchen. Trust the experts to guide you through this process, and soon, you'll be able to enjoy the renewed charm of your kitchen. For professional assistance in your kitchen furniture and cabinetry restoration journey, don't hesitate to contact SERVPRO® of Cape Coral.
What is the Difference Between Mold and Mildew?
11/14/2023 (Permalink)
 By understanding their characteristics, you can take the right steps to protect your home from mold and mildew.
In Cape Coral, it's crucial to differentiate between mold and mildew, as they are common issues that homeowners face. These unwelcome guests can impact your living environment in several different ways, and understanding their differences is key to effectively managing and preventing them. In this blog, we will explore the distinctions between mold and mildew and provide insights on how to deal with them.
The Difference Between Mold and Mildew
Mold:
Mold is known for its fuzzy or slimy appearance, which can vary in color from black, green, blue, to red. It often has a three-dimensional structure and can penetrate surfaces. Mold thrives in damp, humid environments and can grow on various surfaces, including walls, ceilings, and organic materials.
Mildew:
Mildew typically presents as a flat, powdery, or downy surface, commonly white or gray. It stays on the surface and doesn't penetrate as deeply as mold. Mildew prefers specific areas with high moisture levels, such as bathrooms, basements, or poorly ventilated spaces.
Why Understanding the Difference Matters
Identifying the type of growth in your home is essential for effective removal. Mold and mildew require different treatment methods and solutions. Knowing where to expect mold or mildew growth can guide your preventive efforts. Proper ventilation, humidity control, and regular cleaning are effective strategies for deterrence. Mold can penetrate surfaces and cause structural damage, while mildew is typically easier to clean and remove. Correctly identifying the issue can save you time and money.
Preventing Mold and Mildew in Cape Coral
Regularly inspect and maintain areas with high moisture levels, such as bathrooms, kitchens, and basements. Ensure proper ventilation in your home to control humidity levels. Clean and disinfect surfaces prone to mold or mildew growth on a routine basis. Address water leaks and moisture issues promptly to prevent their growth.
In Cape Coral, recognizing the distinctions between mold and mildew is essential for effective prevention and management. By understanding their characteristics, you can take the right steps to protect your home from these common intruders. Whether it's mold or mildew, remember that professional assistance is just a call away. SERVPRO® of Cape Coral is here to help you maintain a safe and mold-free home.


 24/7 Emergency Service